FAQ BadgeMaker
BadgeMaker Design
Dynamic data represents recurring data needed on a card design for different card holders. For example: First names, Last names or Departments on an employee badge. With the start of a new card design it is important to create the needed dynamic fields for the dynamic data on a card design. When dynamic data is linked to project data, the dynamic data placeholder will be replaced with the card holder data.
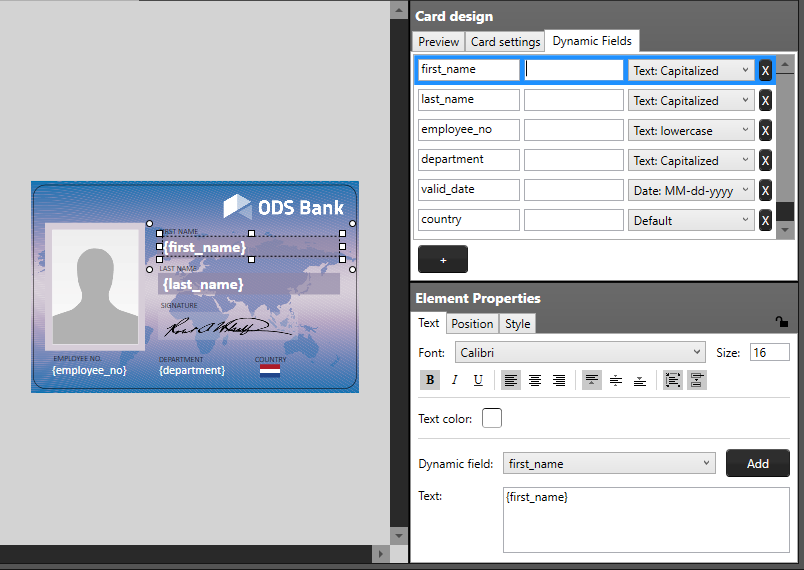
The tab “Dynamic fields” in the card design view will give a list of the dynamic fields in the layout. When a text element is added to the card design, and the text in the text element has a name {between curly braces}, DesignStudio will detect this as a dynamic field name and will be added to the list of Dynamic fields.
The user can delete, change and edit the field names and enter default values to be used as preview.
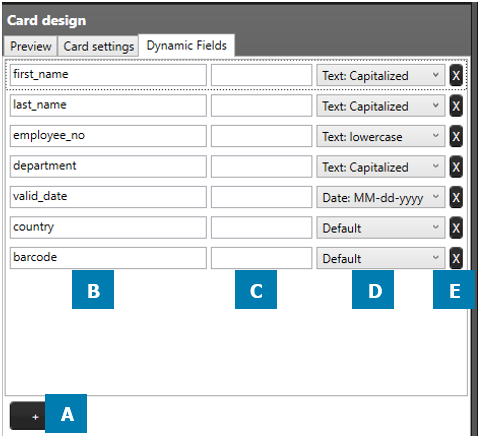
How to add dynamic fields available to choose from in your element properties:
A. Add a new dynamic field to the list by clicking on the “+” button.
B. Enter a dynamic field name by clicking on it and rename it from, for example, “Dynamic Field 1” to “first_name”.
C. It is possible to enter a default value for the fields. For example, the default value for “department” can for example be “Sales”.
D. A dynamic field can have a certain format, the drop-down menu offers a couple of options. For example, the value of a certain dynamic text field needs to be “CAPITALIZED”.
E. Click on the “x” button to delete a dynamic field.
The BadgeMaker Software lets you disconnect your license key from the software installation, so you can use the License key on another installation. So when you buy a new computer you can install the BadgeMaker Software on your new computer, disconnect the License Key from BadgeMaker on the older computer and then use the key to register the new PC.
In just a couple of easy steps disconnect your license key from your BadgeMaker Software:
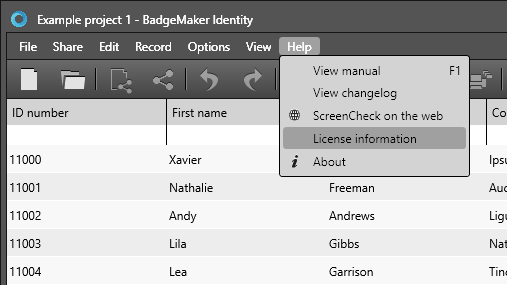
Step 1. Navigate to License information
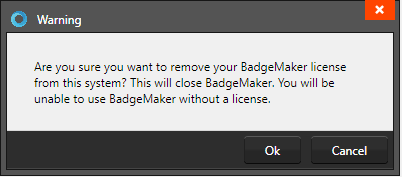
Start BadgeMaker Design or Identity and click on the “Help” button in the main menu. Then select “License information” in the submenu. Press “Ok” to confirm and disconnect Badgemaker key from this installation.
Step 2. Disconnect BadgeMaker key
Now click on the button to “Remove license”. BadgeMaker prompts a warning, asking if you are sure you want to remove the license key from this system. You can always find the license key disconnected from the software in your License Manager account. Next to removing the license key, it is possible to purchase an extra key or upgrade a key using a Badgemaker License Manager account.

Card Design from the BadgeMaker Store
The BadgeMaker Store offers the convenience of professionally designed cards, with the ease of tailoring them to your badge maker content in BadgeMaker Designer.
If you know exactly what you’re looking for, type the name of the design in the search bar at the top of the Store window. You will get a number of results related to the term.
Alternatively, use one or more of the available tags; Screencheck, Healthcare, Education, Corporate, Food signs and BadgeMaker.
If you don’t have something specific in mind, browse all designs by clicking on the different preview images on the Store home page. Get inspired whether you’re an ID badge maker or looking for that professional touch to your food signs.
Find the card design you want and add that card design bundle to ‘My items‘. Simply click on ‘Add to my items’, select the card design in ‘My items‘ and download it. Once you’ve downloaded the design, it will be automatically opened onto your BadgeMaker canvas. Use the template by changing the colors to fit your corporate identity, add your own images and link your data.
Step-by-step guide
To browse the store, go to ‘Store‘ in the main menu and click on ‘Browse store‘. In the Store you see an overview of all the card design bundles available to select and add to ‘My items‘.
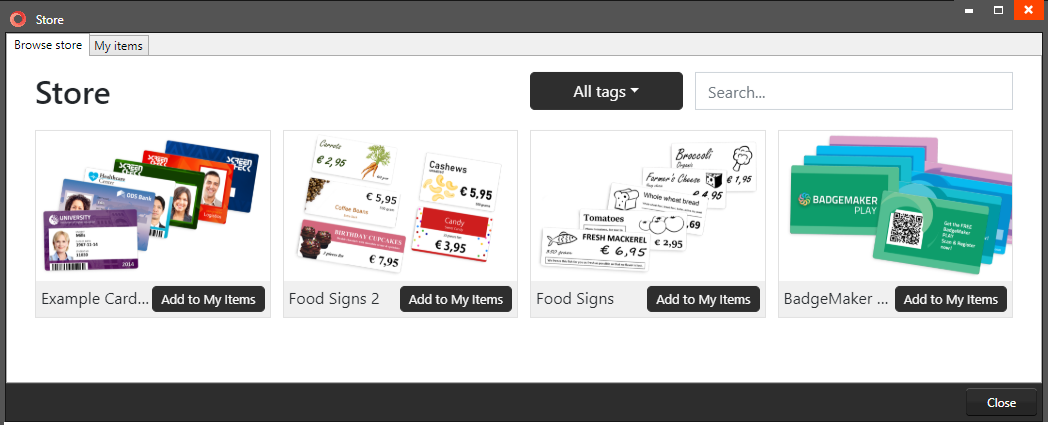
Click on the bundle image to learn more about the bundle and its card designs.
![]()
Click on ‘Add to My items‘ to add the collection of card design and make them available for download.
My items
All the selected card designs added from the Store can be found in the ‘My items‘. These card designs will always be available for you to download.
![]()
Click on ‘Download‘ to download the selected card design, give the downloaded card design a name and start working with it in Badgemaker Design.
First step to make your own badge with Magstripe is to start BadgeMaker Design. Select the “New Card Design” icon to create a new card design with Magstripe. Set the configuration of the card to CR80, keep the design double-sided and check the Magstripe selection box.
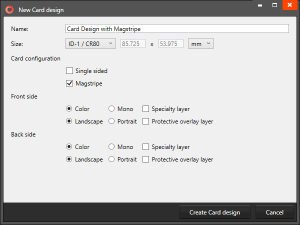
You now have a card design with a Magstripe layout.
Add your design, like a background, text and a logo.

Now use the quick menu to only show the backside of the card design, so we can focus on the Magstripe.
To encode the Magstripe you first select the Magstripe element on the card layout, the encoding tracks for the Magstripe appear in the Element Properties view.
The magnetic stripe can store data. There are up to three tracks on magnetic cards known as tracks 1, 2, and 3.
Track 1 can hold 77 alphanumeric characters, track 2 can hold 38, but only allows numeric characters.
Track 3 holds 105 characters that are also only numeric.
You can add static data to the tracks or use the dynamic fields to add dynamic data. Let’s create three dynamic fields, that can be connected to project data, such as a Name, Expiration date and an Identification Number.
For the data entered in the track you can check the LRC box to have a longitudinal redundancy check. LRC is a kind of checksum, which can be used to verify the integrity of track data.

The setup for the Card Design with the Magstripe is ready. We now need to combine the project data in BadgeMaker Identity with the Magstripe card design.
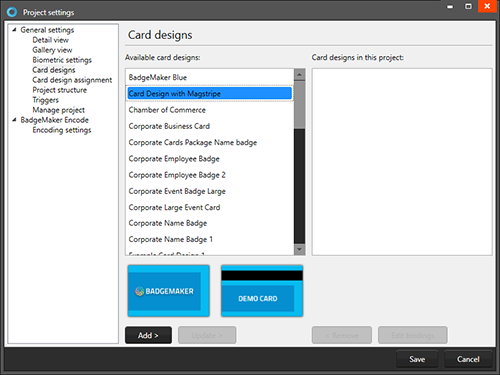
Click on the BadgeMaker Identity Icon in the quick menu and open the project you would like to connect to the Magstripe card design. Go to “Edit” the “Project Settings” and select “Card Designs” to add the Magstripe card design.
Because the Magstripe tracks contains dynamic data we need to bind the dynamic fields to specific data columns in the project.
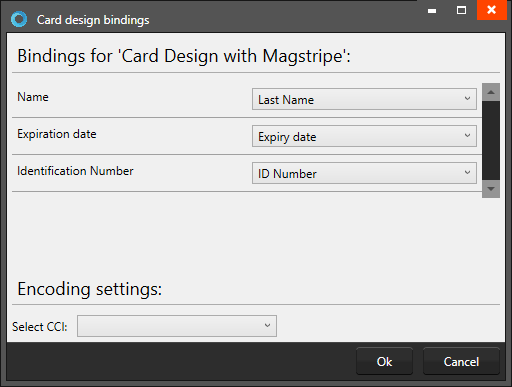
Save the design and settings to your project.
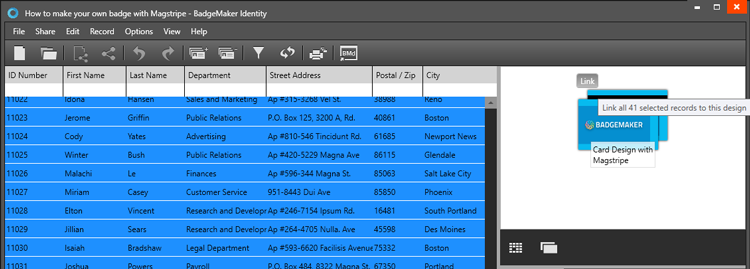
Now link all records in the project to the Magstripe card design.
Use and setup a card printer that supports Magstripe encoding. You are now ready to print and encode your Magstripe cards.
Also check out the BadgeMaker Tutorial Videos for more information.
BadgeMaker Identity
The BadgeMaker Software lets you disconnect your license key from the software installation, so you can use the License key on another installation. So when you buy a new computer you can install the BadgeMaker Software on your new computer, disconnect the License Key from BadgeMaker on the older computer and then use the key to register the new PC.
In just a couple of easy steps disconnect your license key from your BadgeMaker Software:
Step 1. Navigate to License information
Start BadgeMaker Design or Identity and click on the “Help” button in the main menu. Then select “License information” in the submenu. Press “Ok” to confirm and disconnect Badgemaker key from this installation.
Step 2. Disconnect BadgeMaker key
Now click on the button to “Remove license”. BadgeMaker prompts a warning, asking if you are sure you want to remove the license key from this system. You can always find the license key disconnected from the software in your License Manager account. Next to removing the license key, it is possible to purchase an extra key or upgrade a key using a Badgemaker License Manager account.
BadgeMaker Encode
First step to make your own badge with Magstripe is to start BadgeMaker Design. Select the “New Card Design” icon to create a new card design with Magstripe. Set the configuration of the card to CR80, keep the design double-sided and check the Magstripe selection box.
You now have a card design with a Magstripe layout.
Add your design, like a background, text and a logo.
Now use the quick menu to only show the backside of the card design, so we can focus on the Magstripe.
To encode the Magstripe you first select the Magstripe element on the card layout, the encoding tracks for the Magstripe appear in the Element Properties view.
The magnetic stripe can store data. There are up to three tracks on magnetic cards known as tracks 1, 2, and 3.
Track 1 can hold 77 alphanumeric characters, track 2 can hold 38, but only allows numeric characters.
Track 3 holds 105 characters that are also only numeric.
You can add static data to the tracks or use the dynamic fields to add dynamic data. Let’s create three dynamic fields, that can be connected to project data, such as a Name, Expiration date and an Identification Number.
For the data entered in the track you can check the LRC box to have a longitudinal redundancy check. LRC is a kind of checksum, which can be used to verify the integrity of track data.
The setup for the Card Design with the Magstripe is ready. We now need to combine the project data in BadgeMaker Identity with the Magstripe card design.
Click on the BadgeMaker Identity Icon in the quick menu and open the project you would like to connect to the Magstripe card design. Go to “Edit” the “Project Settings” and select “Card Designs” to add the Magstripe card design.
Because the Magstripe tracks contains dynamic data we need to bind the dynamic fields to specific data columns in the project.
Save the design and settings to your project.
Now link all records in the project to the Magstripe card design.
Use and setup a card printer that supports Magstripe encoding. You are now ready to print and encode your Magstripe cards.
Also check out the BadgeMaker Tutorial Videos for more information.