Navigation
BadgeMaker Identity
BadgeMaker Identity makes the elaborate card design process as easy, fast and intuitive as possible. Accommodating the users in your organization that are set with the task managing data and printing cards. Using an user friendly overview that shows all the tools and is easy to navigate.
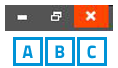
Window navigation
The window navigation give the option to A. minimize, B. maximize or C. close.
Main Menu
The main menu offers the options: File, Share, Edit, Record, Options, View and Help
![]()
Which contain 6 submenus, 7 when the BadgeMaker Share Add-on is active:
 |
 |
 |
 |
 |
 |
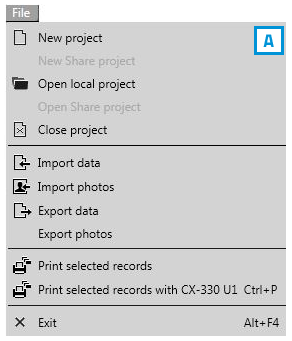
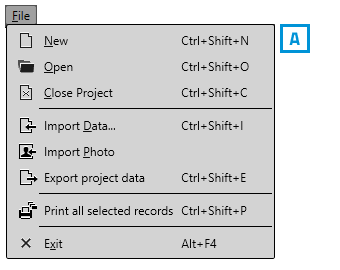
A. File
The first button offers the main functions needed to start, use, manage and end a BadgeMaker Identity Project:
– New
– Open
– Close Project
– Import Data
– Import Photo
– Export project data
– Print
– Print with…
– Exit
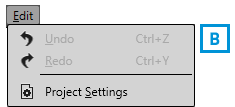
B. Edit Menu
The second button will offer the edit functions and project settings that you use during the data managing process:
– Undo
– Redo
– Project Settings
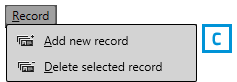
C. Record Menu
The third button give you control over the records being able to add new records or delete existing records.
– Add new record
– Delete selected record
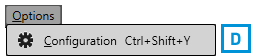
D. Options Menu
The Options menu brings you to the configurations of the application like date and language settings.
– Configuration
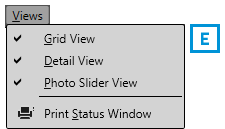
E. Views menu
The Views menu makes it possible to make certain views in the main window visible or invisible.
– Grid View
– Detail View
– Photo Slider View
– Print Status Window
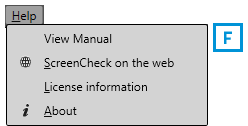
F. Help menu
For more information on the application or an users guide click on the Help button.
– View Manual
– ScreenCheck on the web
– License information
– About
Quick Menu
When opening BadgeMaker a quick menu appears showing two buttons in the middle of the interface, allowing users to continue working with an existing project or creating a new project.
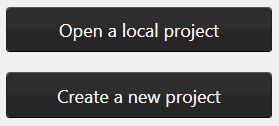
The Quick Menu offers the buttons most used directly clickable. Making main navigation fast.

A. New
Click on this button to start a new Project.
B. Open existing Project
Click on this button to open an existing Card design.
C. New Share Project
Click on this button to start a new Share Project.
D. Open Share Project
Click on this button to log in to the BadgeMaker Share server and work on shared projects.
E. Undo
This button gives you the options to undo processing steps.
F. Redo
This button give you the options to redo processing steps.
G. Add a new record
This button give you the options to add a new record to the data grid. This means putting in new information, adding a photo and if needed adding a signature.
H. Delete a selected record
This button give you the options to delete a record from the data grid.
I. Print all selected records
Print all selected records using the most recently used printer and settings.
To print one or more records, select them and click this button to print the records using the most recently used
printer and print settings. On first-time use, the printer dialogue will be displayed.
1. A print window pops up so you can select the printer you installed for the card printing process. This manual does not describe the installation of printers. Please refer to the manufacturers manual for further information on these devices. After selecting the printer, click on the “Print” button.
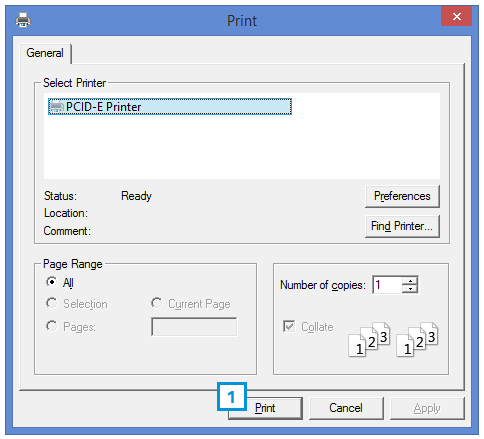
Fig. Example printer setup window.
2. A print progress window will pop-up that will show you the progress of the cards that are being printed.
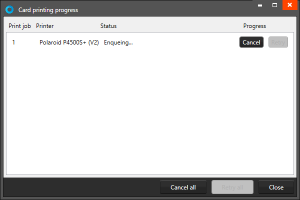
Fig. Example of the Card printing progress window.
J. Filter records
Have a lot of data in your data grid? This button will be helpful giving you all kinds of different filter options to search for specific groups or a certain person. You can add multiple filter sets. Every filter set can have one or more filter rules. You can combine one or more filter sets to make your search more specific.
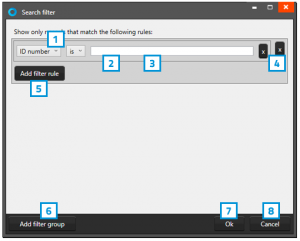
Fig. Example of the filter options window that pop-up after clicking the filter button in the
Quick menu.
- To setup a filter rule start with selecting one of the fields that you want to search in. This will narrow a search and make it faster.
- After selecting the field you need to select how specific you want to match the field with the input that you will put into field 3. If the value is very specific choose “is”, if you do not want it to be to specific you can choose “Starts with”
- Put in the information you are looking for depending on if a search is specific or needs to be a group. For example you could put in a complete index number to find a certain person or just the start of a number.
- The “X” buttons are to delete a filter rule or a filter set.
- Click on this button to add a new filter rule to this filter set to narrow your search.
- Click on this button when you want to add a new filter set. Example: You use a filter set when searching for two different type of records and need to add a separate search.
- Cancel filter option.
- To start the search/filter process click on the “Ok” button
K. BadgeMaker Design
This Quick button let’s you open BadgeMaker Design and continue with creating or adjusting your card design.
L. Refresh Data
This button allows you to refresh data when working with BadgeMaker Connect projects making sure all data is up to date with the connected data bases.