D. Import Project from Excel
BadgeMaker Identity
1. Data source
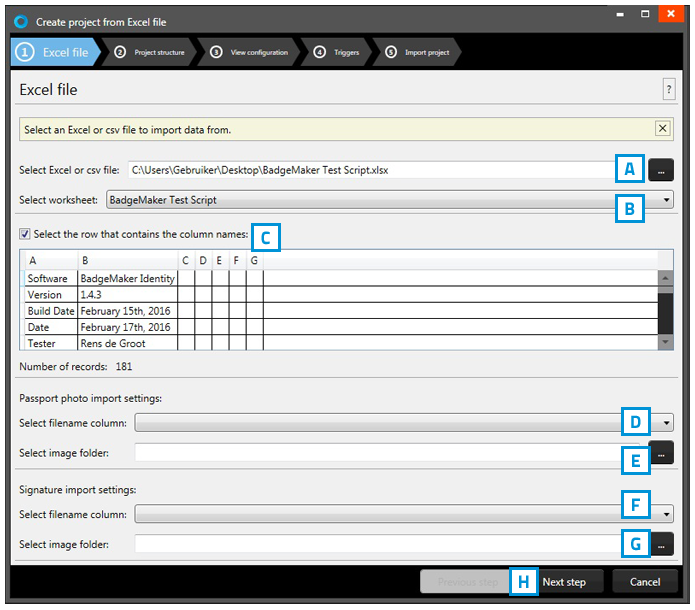
Fig. Example of step 1. New project imported from excel file: Data source.
A. Click on this button and select the Excel/CSV file you want to import and create a new project with.
B. Select the worksheet you want to use from the drop down menu.
C. Select the row that contains the column names.
D. Select the column that connects with the unique photo names (for example: ID number or index)
E. Select the folder that contains the card holders photos
F. Select the column that connects with the unique photo names (for example: ID number or index)
G. Select the folder that contains the card holders photos
H. Click on the “Next step” button to continue to second step.
2. Project structure

Fig. Example of step 2. New project: Project data fields.
A. Type in the name for your new project.
B. Check these boxes when the project needs signatures and or photos.
C. Put in the column name
D. Set the data type. Select if the data are number or text for example.
The following types of database fields are supported:
– Text
– Number
When selecting this type you can select ‘auto-increment’ . When a new record is created the number will be the highest number in the Project increased by 1
– Decimal
– List
When this type is selected you can add and delete the list values form the list that is presented for this database field when a value must be entered
– Date
– Email address
– Phone number
E. Check these boxes if the field needs to be “Required” and or “Unique“.
F. With the default input field you can add a standard value to your data field, existing empty fields and new records will automatically get the default value you add to this data field.
G. Click on the “X” button to delete a data field from the project structure setup.
H. Click on the”Add new property” button and add and describe the data field names you want to use in your new project.
I. Click on the “Next step” button to go to step 3. and configure the detailed and gallery view
3. View configuration
During step 3. you can choose for the default configuration or adjust the setup for Detailed and Gallery view.
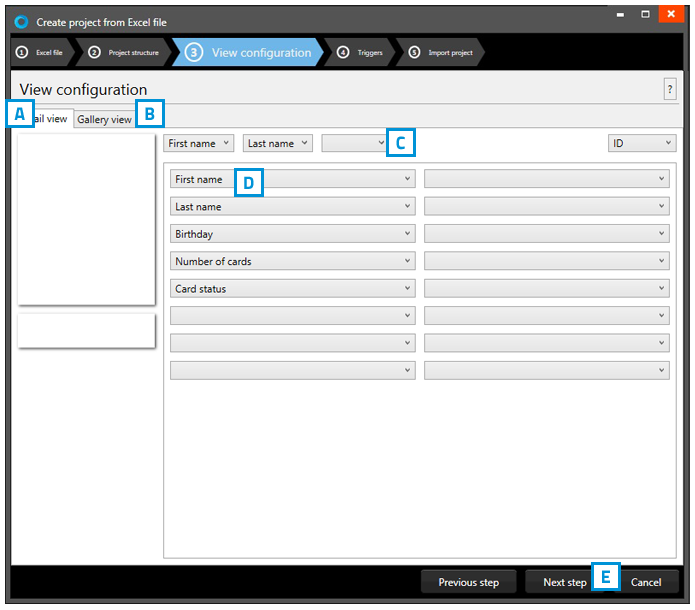
Fig. Example of step 3. New project: View configuration.
A. Tab to configure Detailed view showing specific card holders information.
B. Tab to configure Gallery view showing card holders photos
C. Setup the title for the detailed view.
D. Setup the information that will be shown in the detailed view.
E. Click on the “Next step” button to go to step 4. and add triggers to the project.
4. Triggers
Step 4 allows you to setup trigger for your project. Triggers can be used to automatically change data in you project on a certain condition or event.
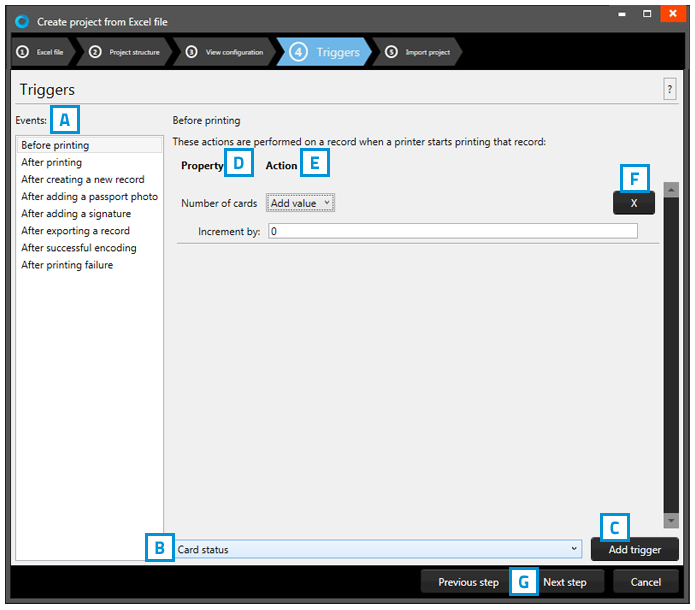
Fig. Example of step 4. New project: Triggers
A. Select one of the events from this list and add specific triggers. BadgeMaker Identity will automatically wait for the event to occur before performing the action that is linked to the trigger.
B. All data columns of the new project are listed. Select one of the columns in order to link a trigger action to it.
C. Click on the “Add trigger” button to add the trigger to the data column and specify the Trigger with events and actions.
D. The property shows you the selected data column.
E. Select the action you want to connect to the data column from the drop down menu and define the action.
F. Click on the “X” button to delete a trigger from an event.
G. Click on the “Next step” button to go to step 5. and create the project.
Define the action that is performed once the event has been met. Some actions are only available for specific columns (for example, incrementing number values can only be done on Number type columns). All changes need to be saved before they become active. Understand that Triggers might cause your original data to change, so make sure no vital data is lost when working with Triggers.
5. Import project
A. Step 5 will create the new project imported from an excel file as soon as you click on the “Create project” button. B. Click on the “Previous step” button to make any changes before creating the project.

Fig. Example of step 5. New project: import new Excel project.