BadgeMaker Share
Installation
Installation of BadgeMaker Share takes places in a couple of steps. We identify them as follows:
3.1 Selecting a server computer
Before starting the installation procedure, it is important to select a computer system that is designated the exclusive task of running BadgeMaker Share Server. The system should comply with the following requirements:
- – Running Windows 7 Professional or greater.
- – An Intel Core i5 or Core i7 processor running at 2.0Ghz or greater.
- – A minimum of 4GB RAM, 8GB RAM is recommended.
- – A 7200 RPM hard drive. Using a Solid State Drive is recommended. The available space depends
on your project requirements. - – A permanent 100 Mbit Ethernet connection (Wired) to other systems in the network.
- – A user profile with full administrative rights on the system.
Please note: Deviating from the minimum system requirements will severely impact the user experience when connecting to the BadgeMaker Share Server.
3.2 Installation and configuration of BadgeMaker Share Server
Once the appropriate server computer is selected, you can start with the installation of BadgeMaker Share Server. Download the BadgeMaker installer file from badgemaker.info or use your login credentials to the License Manager to retrieve the installation files.
Please note: The installation procedure is performed similar to regular installations. Please refer to the corresponding chapter for more information on installing BadgeMaker.
During installation, it is important to check the box for BadgeMaker Share Server, as well as BadgeMaker Identity and BadgeMaker Design. Once completed, click the icons placed on the desktop during installation, or navigate to the installation directory, and find the folder titled “Server”. This folder contains all the files needed to run BadgeMaker Share Server.
Start the application “BadgeMakerServerUI.exe” with administration rights using Right Click, and select “Run ad administrator”. You will be prompted with the license screen, where your BadgeMaker Base or Pro license that features the BadgeMaker Share Add-on can be entered. Once completed, the user interface for the BadgeMaker Share Server will launch.
Please note: You may be prompted to create an exception for BadgeMaker Share Server to your firewall. It is important to allow for this step, since client systems will be unable to connect to the server if the exception is neglected.
3.3 Configuration
Once the installation procedure is completed, it is time to configure your BadgeMaker Share Server. The first step is to configure the IP address and port on which client systems will be able to connect. It is important to add the local IP address that can be used by client systems to connect to the network. Please make sure that your system is discoverable on the Local Area Network as well.

3.4 Project roles
The next step is to configure Project Roles that match the requirement of your organisation. By default, certain roles are entered as an example. It is possible to create a new project role by entering a title in the bottom right corner, and clicking “Create new project role”.
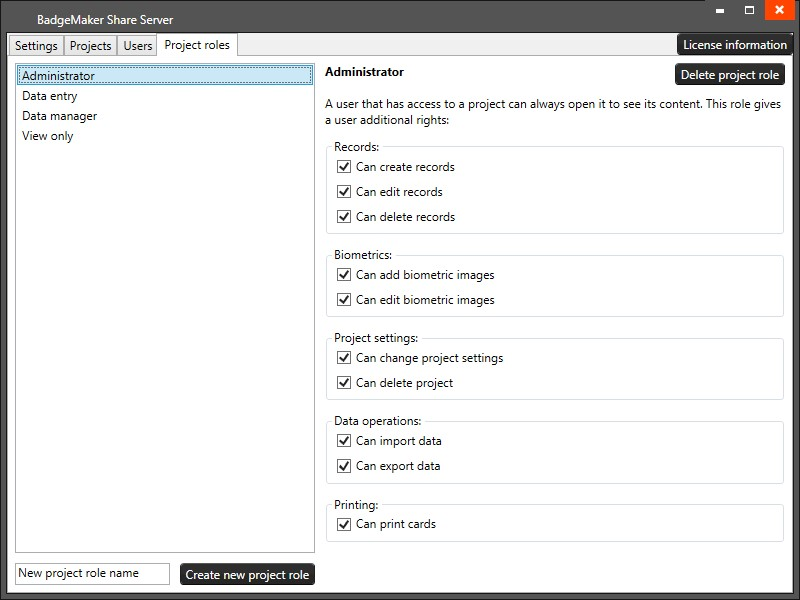
The following roles can be turned on or off by clicking the checkboxes on the screen:
Records
- – Can create records
- – Can edit records
- – Can delete records
Biometrics
- – Can add biometric images
- – Can edit biometric images
Project settings
- – Can change project settings
- – Can delete project
Data operations
- – Can import data
- – Can export data
Printing
- – Can print cards
3.5 Users
Once project roles have been set, it is time to create accounts for users who should be able to connect to a project. If you are running a clean installation of BadgeMaker on your server, it is likely that no projects are present on the system. In which case, it is recommended to create a single user with the rights to create projects on the server, before creating new user accounts.
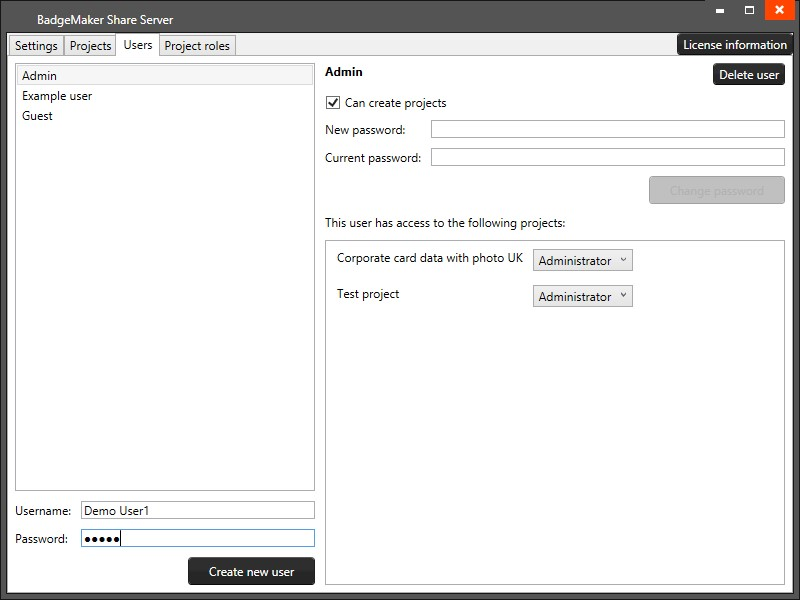
Creating user accounts
Navigate to the Users tab in BadgeMaker Share Server, enter a username and password in the fields in the bottom-left corner, and click “Create new user”. The newly created account will appear in the list above the input fields, and can be selected in order to inspect which projects the user has been granted access to.
Creating the Administrator user
Once a user account is created, select the user in the field above the input fields, and check the “Can create projects” checkbox on the right. That specific user will now be able to create new projects on your BadgeMaker Share Server. You will also use this account in the next step of the process.
3.6 Projects
Once roles have been created, and user accounts have been setup, you can navigate to the “Projects” tab to find out that no projects have been registered on your system. Because of this, we will create a new project first, before finalizing the configuration of BadgeMaker Share Server.
Launch BadgeMaker Identity on the server computer, or on a client system if so desired. Enter the license information, and perform the following actions:
- – Click “Share” in the toolbar, and select “Connect to server”.
- – Enter the username and password of a user that has the rights to create projects.
- – Click the Show Server Settings button.
- – Enter the Local Area Network IP address that was entered during the previous steps.
- – Enter the Port address that was entered during the previous steps.
- – Click “Log in” to connect to the server.
If you performed all steps correctly, you should be able to see a connection status image turn to green in
the lower right corner of your window. You may always refer to this image to check if you are still connected
to the server.
- – Click “File” in the toolbar, and select “Create new share project”.
- – Follow the project creation wizard. Once completed, the project will appear in the Projects tab on your BadgeMaker Share Server.
Please note: If you have previously installed BadgeMaker on your server computer, you may see projects appear in the list. If this is the case, you can skip this step, and continue to assigning users to projects.
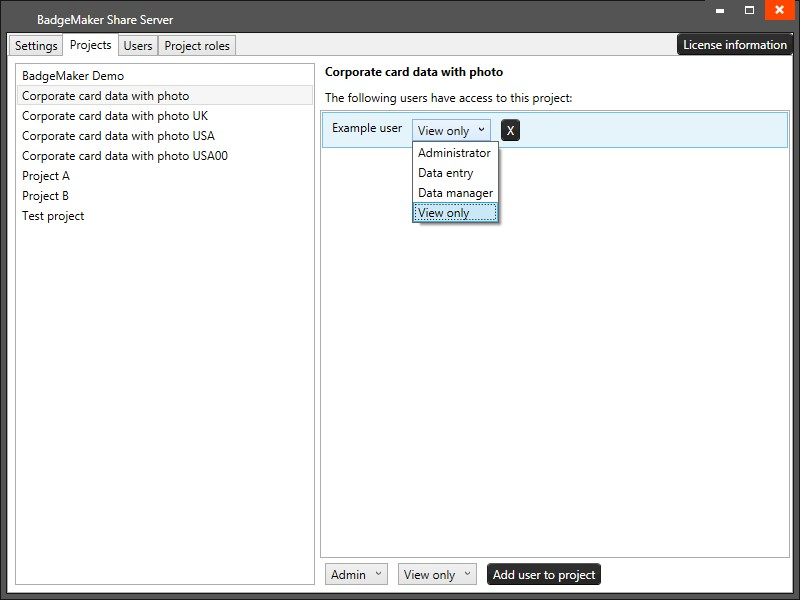
Assigning users to projects
Once created, it is possible to assign user accounts to a project. Select the Projects tab on your BadgeMaker Share Server, and select the project you wish to assign users to.
From the drop-down boxes on the bottom of your screen, select the user account you wish to add, as well as the role you wish to assign to the user for this specific project. Click “Add user to project” to complete the procedure.
Users may be added to several project, each time with a different role. If a role is updated or altered, it will be automatically reflected for users once they establish a connection with the BadgeMaker Share server.
3.7 Installation and configuration of BadgeMaker Share Client
For client systems, installation is performed just like a stand-alone installation of BadgeMaker. Follow the corresponding chapter for more details on the installation procedure. Once completed, you may launch BadgeMaker Identity by clicking the icon that was placed on the Desktop during the installation procedure, or navigate to the installation directory and start BadgeMaker Identity manually.
During first start-up, you will be prompted to enter your license. This is where you enter the license key that is intended for the client machines connecting to the BadgeMaker Share Server. If you have been issued an “Online License”, you will be able to use the same key on the number of client systems that was indicated in your order.
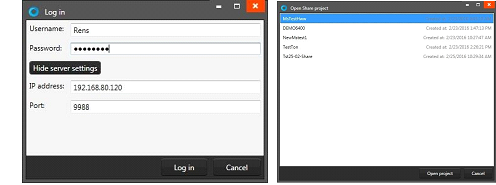
Once activated, you are able to connect BadgeMaker Identity to the BadgeMaker Share Server: Click “Share” in the toolbar, and select “Connect to server”.
- – Enter the username and password of a registered user account.
- – Click the Show Server Settings button.
- – Enter the Local Area Network IP address of the BadgeMaker Share Server.
- – Enter the Port address of the BadgeMaker Share Server.
- – Click “Log in” to connect to the server.
If you performed all steps correctly, you should be able to see a connection status image turn to green in the lower right corner of your window. You may always refer to this image to check if you are still connected to the server.
Note: BadgeMaker Share Client behaves slightly different from BadgeMaker Identity. Here is a list of things to keep in mind when using BadgeMaker Share Client:
- – BadgeMaker Share Client will “inherit” all features and rights from BadgeMaker Share Server. If a button is disabled, or if you are unable to perform an action, it is likely that your account does not have permission to perform that action.
- – Data will only be processed when the connection is active. Keep an eye on the connection indicator button if you feel that your information is not processed. Your connection to the BadgeMaker Share Server might be poor.
- – Uploading data might take time. If you are attaching a large file (a photo for instance) to a record, it might take longer than usual to process these changes. This is because all information has to be first sent to the BadgeMaker Share Server before it is reflected on all other client systems.