What you need to start encode smart cards
You chose a smart card that is best suited for your organization, now it is time to learn about how to properly implement its functionality. In order to be able to encode smart cards, you need the following:

Can be either MIFARE Classic, Plus or DESfire, usually in CR80 standard size.
A card printer with a MIFARE compatible card reader
The MIFARE reader is built into your card printer, and will connect to your computer through a separate USB cable. Your operating system will automatically install the device, and list it in the Device Manager.
BadgeMaker Base + Encode or BadgeMaker Pro
We will be using the BadgeMaker software suite by ScreenCheck, which supports encoding of smart cards in its Base version with the Encode Add-on, or in the Pro version.
CCI Editor
This software is part of the BadgeMaker software suite, but we mention it separately because it allows for creation of the encode template file that we use to encode smart cards with.
Start with a Badgemaker Project
Before we start to encode smart cards, setup an existing BadgeMaker project that contains all your data. If you do not have a BadgeMaker project yet, create one using this tutorial, or use the Example Project that is installed with each new installation of BadgeMaker.
For this tutorial, we assume the use of a MIFARE Classic 1K smart card. This is a relatively inexpensive card that you can use for most applications such as access control, or enhanced identification.
Let’s say we want to store information of the card holder in the smart card. Store the list name, email address as well as a unique number that allows other systems to identify them.
The BadgeMaker project data likely looks something like this:
10000
10001
John
Jane
Doe
Doe
Create an encode template with the CCI Editor
Start the CCI Editor to build the encode template. The CCI Editor automatically installs along with the BadgeMaker software. If it is not on your system, run the installer again, and make sure to enable the installation of the CCI Editor. Select the following template in the CCI Editor:
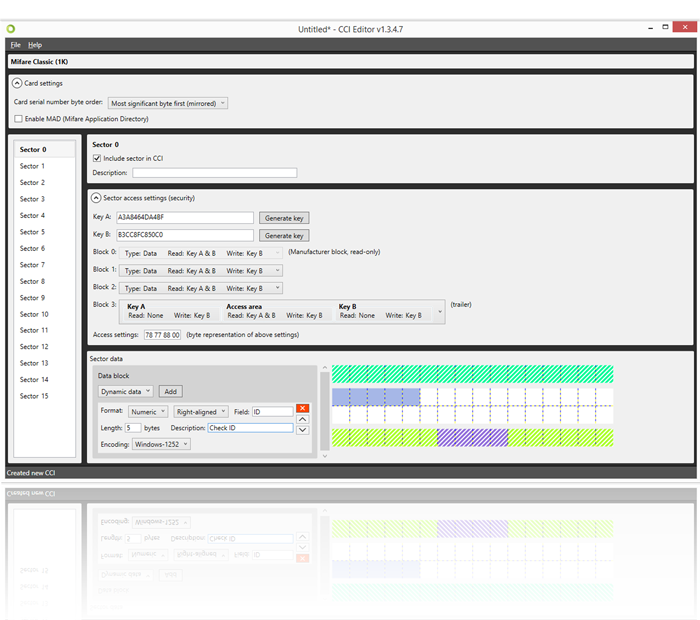
File > New > MIFARE Classic (1K)
An empty template is now created, ready for configuration. First configure the Card Settings. Select the Card serial number byte order, and choose to enable or disable MAD. Leave both options on the default setting.
On the left of the template is a list of 16 individual sectors numbered from 0 to 15. Each sector represents a section of the card that can be filled with data. While each sector holds a total of 64 bytes, not all of that space can be used to our advantage.
Select sector 0, and check the box Include sector in CCI. Notice that a grid of squares becomes visible, some white and some are a hashed color. The hashed squares represent data reserved for either manufacturer information, or with information that is needed to access the data. For now, we enable sector 0.
Configure sector access
Configure access to sector 0, this may look a bit daunting at first, but we’ll keep things simple. Next to the fields for Key A and Key B, is a generate button. Click both buttons to see a series of numbers and capital letters appear. This is the key that applications need to use to access the information in the sector.
Note: Sometimes, these keys are defined by the security or payment system you use in your organisation. You can add these keys to the fields manually as well. Note that the key will always be the same length (12 characters).
The next couple of drop-down boxes allow you to determine how to use the keys to access your data. For example, you may choose to allow both keys to read the data from the card, but not allow them to write information to it. You may also choose to use just one of the keys to write the data to the card. This allows for an extra level of security in your organization, because you can choose to provide one key publicly, and keep the other private. In this example, we will leave all settings to their default setting.
Add data to the sector
It is time to add data to the sector. Take a look at the data table, and notice that we have several bits of information we want to store: First name, Last name, Email address and ID. Let’s start with the ID first. The ID appears to be a number with three digits. Since the data will be encoded into the card through the BadgeMaker software, we need to select “Dynamic data” in the Data block section, and click “Add”.
This will fill 16 of the empty squares with colors. That means that we’ve now reserved a block of data that can hold 16 characters. For the format, we select “Numeric” as the data will contain just numbers. We change the “Left-aligned” default setting to “Right-aligned”, which means that the data block will be filled from the right. We enter “ID” in Field, and notice that the color of the block has now changed. This is merely to visually distinguish one piece of information from another. We have still reserved 16 blocks, while we need only 5, so change the length from 16 to 5. In the description field we enter something that reminds us what the block does, and finally we can leave the Encoding setting to the default setting. You will end up with something that looks like this:
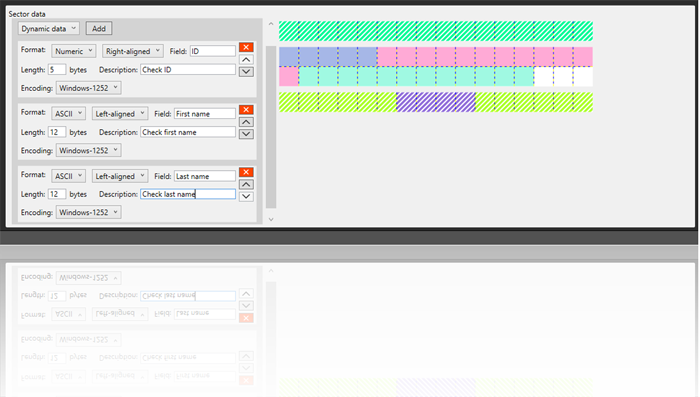
We create two more blocks for First name and Last name. We use the ASCII format for both, and set the length to 12 bytes, to allow for longer names. Complete the input box for Field to make the blocks a distinguishable color, and leave the encoding to default, as well as the alignment setting. Your end result will be something like this:
Use second sector to store more information
We’ve run into a problem. We still need to store the email address, but are out of space in this sector. Do we keep all of our information in one sector, or split up data over multiple sectors? Let’s keep our ID in sector 0, but move our other information to Sector 1. So we do the following:
2.Enable Sector 1
3.Generate keys A and B.
4.Re-create the blocks for First name and Last name.
5.Create an additional block for email address.
6.Choose a length of 24 bytes to completely fill the available blocks in sector 1.
We’ve now ended up with two configured sectors, each holding different types of data from our database. Save your template in either the .CCI or the .XML format. The .CCI format allows you to set a password making your template unreadable. If you choose to do this, you will have to enter your password again in the next step of the process.
Link the CCI file to the BadgeMaker project
The template is created, we are one step closer to print and encode smart cards. Start BadgeMaker Identity, and load your project. In order to encode smart cards, we will link the CCI file to the project. This is done by choosing the following:
Edit > Project settings (Opens a new window) > Encode settings
On the Encoding settings screen, click “Add CCI” and navigate to the location of the CCI or XML file on your system. Adding the file might require you to enter a password if you’ve chosen the .CCI format in the previous step.
Once added, you will see a list of all the Fields that you’ve entered in your CCI template. Using the drop-down boxes, you can link each of the fields to one of the columns in your project. We link ID to the ID number, First name to the corresponding column, and so on.
Once completed, we click the second tab titled “Associated card designs” and from the drop-down box at the bottom, we select the card design that we wish to associate with the CCI template. This way, you can configure different templates for each of the designs you have in your project. You can also choose to link one CCI file to multiple card designs. Once this step is completed, click the save button. You are now ready to start producing your very own encoded smart cards!
Print and Encode smart cards with BadgeMaker
As a final step, select a record that is linked to one of the card designs that you associated your CCI file with. If you choose to print, the card will automatically be encoded and printed. If you have multiple printers or smart card readers connected to your system, the software will prompt you to select the correct smart card reader, as this device actually functions completely separate from your printer hardware.
This concludes our first step into encoding and producing MIFARE Classic smart cards. If you have questions or suggestions, feel free to reach out to us over email or one of the social media channels.